
How To Build Fitness Exercise Videos With AI in 20 Minutes
No gym, no influencer, no cameras, to studio lights. Just you and your ideas. Let's go!

Most fitness creators still rent a studio, hire a coach, light a set, and burn a weekend on a single 30-second reel. There is a faster way. You generate a printable instruction diagram, lock a base character, and let a video model animate the flow.
I run an AI influencer account that pulled 1.2M reach in its second month of life. I cannot show the account (indie principle, no face reveal of the build), but the pipeline below is the same family of techniques. If enough of you ask in the comments, I will open more of the kitchen in a follow-up post.
Here is the exact four-step workflow, with the prompts.
The Stack
GPT Image (GPT-Image-1 / “GPT2 Img”) — generates the instructional pose diagram and the base character.
Seedance 2.0 Omni-Reference by ByteDance — animates the scene from a character reference + a motion-guide image. https://www.volcengine.com/product/seedance and https://fal.ai/models/bytedance/seedance/v2-pro
Codex — stitches the resulting clips and runs frame interpolation.
Optional polish: Topaz Video AI for upscale, CapCut or DaVinci for the final cut.
Step 1 — Generate the Pose Sequence Diagram
This is the cheat code. Instead of describing the motion in words, you give the video model a visual map of every pose in order. The model “reads” the grid like a comic strip.


Drop this into GPT Image:
Create a 12-panel yoga instruction diagram in a clean 4-column by 3-row grid.
Style: black-and-white / soft grayscale instructional poster, off-white background,
thin black panel borders, bold uppercase titles, black rounded number badges,
simple dotted or curved motion arrows, and short coaching captions.
Use one consistent female yoga model across all panels: athletic build,
long wavy hair, fitted sports bra and leggings, barefoot, realistic
photo-illustration style, neutral studio background. Show a classic
vinyasa flow from Mountain Pose to Downward-Facing Dog. Focus less on
overly technical pose detail and more on the feeling of a smooth flowing
sequence, with clear movement, breath, and transitions from one step to
the next.
Each panel should clearly show the motion step and how it transitions
into the next pose. Use arrows to show direction of movement. Keep the
captions short and simple, describing the action, breath, or flow cue
in a natural way.
Make all 12 panels exactly the same size, evenly aligned, highly readable,
and visually consistent. No color. No extra text.Run it twice. You want two grids of 12 panels (24 steps total) so the second half of the flow has its own reference sheet. Crop, clean up text artifacts in Photoshop or Photopea if needed.
For non-yoga work, swap “vinyasa flow from Mountain Pose to Downward-Facing Dog” for whatever you need: kettlebell swing, deadlift, push-up to plank, mobility flow. The grid format is the part that matters.
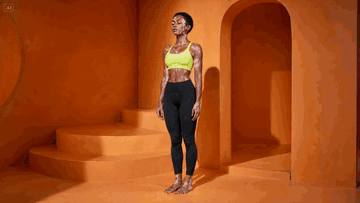
Step 2 — Generate the Base Character
The diagram model is great at form, weak at face consistency. Solve this by generating a clean front-facing portrait of the same person on a neutral set. This becomes your character anchor across every future video.


Crop one panel from Step 1 to get the body silhouette. Feed it back into GPT Image with this kind of brief:
Use the attached silhouette as pose reference. Generate a photorealistic
full-body portrait of the same character, standing in a peaceful orange
clay yoga studio with soft warm light, curved adobe walls, low stairs.
Athletic woman, short cropped hair, vitiligo on shoulders and chest,
neon yellow sports bra, black high-waist leggings, barefoot. Editorial
fashion photography, 50mm, f/2.8, golden hour ambient bounce.
Single subject. No text. No watermarks.
Save this image. Treat it as your IMG1 from now on.
Step 3 — Animate With Seedance 2.0 Omni-Reference
Seedance 2.0’s Omni-Reference mode accepts multiple image inputs at once. You feed it the base character (IMG1) and the pose grid (IMG2), and you tell it explicitly which image controls which thing.
This is the actual prompt format that worked:
Scene: One continuous shot — Hand-held YouTube-style video showing
a woman performing a complete yoga vinyasa flow.
Character: Use IMG1 as the character we’re following in the scene.
Character Motion: Use IMG2 to follow the motion and instructions exactly
to complete her flow.
The scene starts at IMG1.
Direction: The woman stands in a peaceful orange yoga studio. The
hand-held camera subtly pushes in on her as she begins her flow. It
captures the moment in tight composition as she moves from mountain
pose to upward salute.
The camera begins to pull back out as she transitions from upward
salute to swan dive and stays focused on her body as she transitions
from swan dive into a forward fold.
The camera begins to move right to a side profile as she plants her
palms and steps back into the high plank position. The camera drops
lower and pushes in towards her face for a focused close-up as she
moves from chaturanga lower to upward-facing dog.
The camera again pulls out, showing her full body as she transitions
to the downward-facing dog position. Finally, she holds for a deep
inhale and exhale in that position.
Overall Tone: Her movements are all natural and fluid, controlled and
directed, strong with natural body movements and subtle readjustments
as she gets her balance.
SoundFx: peaceful ambient hum as we hear her inhale and exhale in a
rhythmic fashion with each passing pose. No music.Three things matter here:
IMG1 / IMG2 are explicit roles. Do not just attach images. Name them in the prompt and tell the model what each one controls.
The camera is a director, not a tripod. Push-in, pull-out, side profile, drop low. This is what turns “AI demo” into “actual content”.
Sound design lives in the prompt. Seedance 2.0 generates audio. Specify it or you get random elevator music.
Realistic expectation: at 24 poses in one prompt, the model will not match every transition verbatim. Cut the flow into 3 shorter videos of 8 poses each, with shorter prompts per shot, and adherence goes up significantly.
Step 4 — Stitch and Interpolate With Codex
You now have three or four 5-to-10-second Seedance clips. Stitching them by hand in CapCut works, but the cleaner play is to script it.
Run Codex against your local clips folder and ask for an FFmpeg pipeline that:
Concatenates the clips in order.
Runs RIFE or FILM frame interpolation on the seams to hide the cuts.
Re-encodes to H.264 or H.265 at 30 or 60 fps for the platform.
Optionally crops to 9:16 with a Lanczos resize.
A single Codex prompt like “write me an FFmpeg + RIFE script that takes ./clips/*.mp4, interpolates the joins, exports a 9:16 1080x1920 60fps mp4 to ./out.mp4, and prints the final duration” gets you a working script in one shot. Why do this manually? You will iterate. You will swap clips. You want a one-command rebuild.
What Actually Ships Reels
The diagram is repurposable. One 12-panel grid powers:
The Seedance video.
A static carousel post (just slice the grid into panels).
A printable PDF lead magnet.
The thumbnail of the reel.
That is four pieces of content from one image. The grid is the asset, the video is the surface.
Bottom Line
You do not need a gym, a model, or a real face on camera. You need:
A pose diagram generated as a 4×3 grid.
A locked character portrait.
Seedance 2.0 Omni-Reference with explicit IMG1 / IMG2 roles.
A scripted stitch pass.
Pick one exercise this week. Run the four steps. Reply with what broke. If this lands, the next post will go inside the AI influencer build itself: voice, posting cadence, comment management, and the math behind the 1.2M reach in month two.